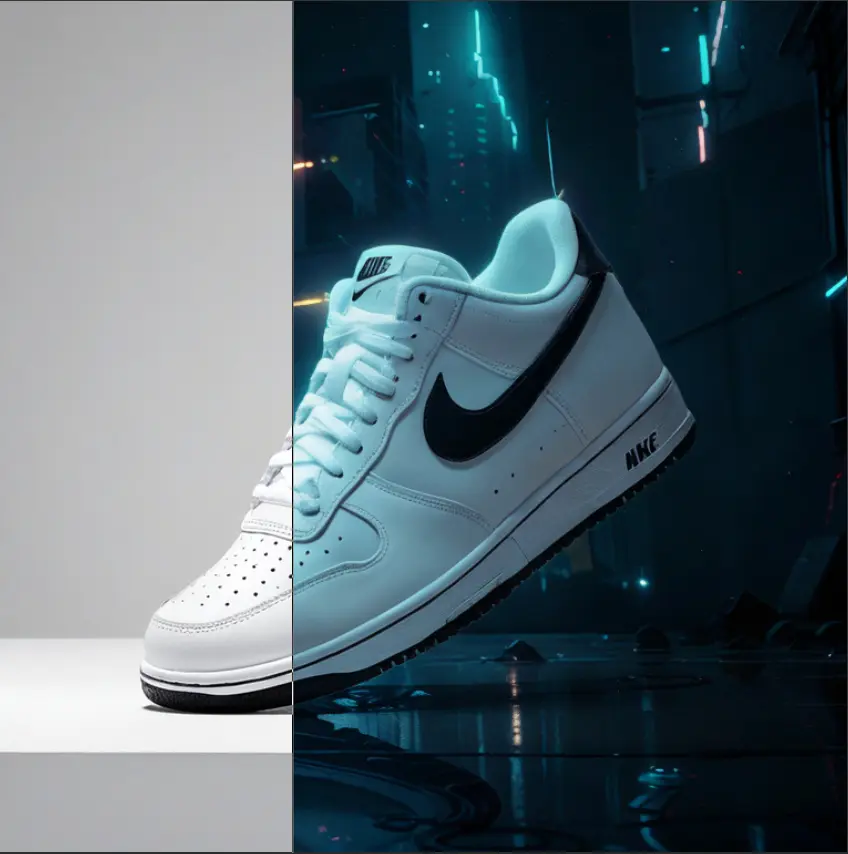
Workflow introduction Remastered from: alansun Workflow source: https://openart.ai/workflows/alansyn/easy product relight/XdzTNRbqi1kMYpNjuFWm Product shadow and light poster drawing based on Brushnet IC Light, convenient and easy to use. By configuring different parameter switches, two mode paths are supported: Basic Mode : Suitable for scenes with simple background elements, controlling the background and light-shadow types through prompts Advanced Mode : Suitable for scenarios requiring more precise control, using precise prompts or style reference images as input, and using brushnet for background redrawing Configuration Parameter Description 1. Basic Prompt : Used to describe the product type, such as 1shoe 2. Light-Shadow Prompt : Used to describe the type of light-shadow, can also add background descriptions, such as sunshine light, river background 3. Product Image : Product mat…
查看原始来源 ↗
Prompt
工作流介绍 改编自:alansun 工作流来源:https://openart.ai/workflows/alansyn/easy product relight/XdzTNRbqi1kMYpNjuFWm 基于 Brushnet IC Light 的产品光影海报绘制,使用方便简单。 通过配置不同的参数开关,支持两种模式路径: 基础模式:适用于背景元素简单的场景,通过提示词控制背景和光影类型 高级模式:适用于需要更精确控制的场景,使用精确的提示词或风格参考图作为输入,并用 brushnet 进行背景重绘 配置参数说明 1. 基础提示词:用于描述产品类型,例如 1shoe 2. 光影提示词:用于描述光影类型,也可以加入背景描述,例如阳光光线、河流背景 3. 产品图像:需要打光的产品素材图,右键选择 `Open MaskEditor` 绘制光照蒙版 4. 风格图像:高级模式下用于重绘背景的参考图,仅在启用 IP Adapter 时生效 5. 分组开关:模式选择以及是否启用 IP Adapter 6. 自定义光照蒙版:在 LightMask Group 中可自定义蒙版的 xy 位置
复用方法
关键决定
用基础和高级两条模式路径分流,基础模式只靠文字提示词控制光影和背景,高级模式则接入风格参考图和 brushnet 背景重绘,这个分层设计让使用者可以按素材和精度需求选择投入成本,而不是所有场景都走一套复杂流程。用右键 MaskEditor 手动画光照蒙版而不是全自动识别打光区域,这个手动介入的步骤是保证光影落在产品正确位置的关键。
换到你的题材
变量是基础提示词里的产品类型描述和光影提示词里的光源与背景描述。骨架是两个模式路径加手动光照蒙版这套结构,换成其他产品类目时,光照蒙版的画法要跟着产品形状调整,规则形状,比如鞋子、瓶子,比不规则形状,比如首饰、织物,更容易画准蒙版。
容易翻车
高级模式要求同时用好精确提示词和风格参考图,两者信息如果冲突,比如提示词写阳光但参考图是夜景,背景重绘容易出现光源方向不一致的问题。光照蒙版画得不够贴合产品边缘时,光影会溢出到背景或产品边缘留下生硬的过渡线,这是复测时要优先检查的地方。
建议模型
Derived Skill
Skill 只从多个已发布 Case 的重复模式中派生,不是另一套投稿内容。
创作者
Sun 长期扎根RunningHub,代表作《Easy Product Relight》,成本控制在中等区间。
继续探索
Workflow Introduction: This is a workflow for creating product posters with astonishingly good results. It can completely replicate your product and then reference the style of the background you want to use, combining the two to finally form a beautiful poster. In our work, we may encounter requirements to create posters and effect displays for a product. The most important thing to note in this requirement is that the product must not change and must blend very naturally with the background image. Of course, if you have advanced PS skills, you can certainly use PS for creation. However, PS is heavily dependent on materials, and if you are not very satisfied with the materials, you can use this workflow to draft your poster. Workflow Idea: First, process the product image by resizing it proportionally to a width of 1024, then cut out the product and create a mask for it. Next, perform …
提示语
工作流介绍: 这是一个用来制作产品海报的工作流,效果非常惊艳。它能完整复刻你的产品,再参考你想要的背景风格,把两者结合,最终生成一张漂亮的海报。 在实际工作中,我们可能会遇到需要为产品制作海报和效果展示图的需求。这类需求里最需要注意的是产品本身不能走样,并且要和背景图非常自然地融合在一起。当然,如果你有高超的 PS 技巧,完全可以用 PS 来制作。不过 PS 高度依赖素材,如果你对素材不太满意,就可以用这个工作流来起草你的海报。 工作流思路: 首先,对产品图进行处理,按比例缩
一份详细的提示词,用于生成具有 20 世纪 70 年代图形风格的奇趣字母集,包含俏皮的圆体字、粗轮廓以及鲜艳的柔和色调装饰。
提示语
一组字母表字母,{argument name="letters" default="A through Z"} 与装饰元素在 {argument name="background color" default="white background"} 上分行排列。字母采用俏皮圆润的字体,带粗黑轮廓和鲜艳粉彩色。许多字母配有风格化图形:花朵、爆炸星、爱心、蝴蝶结和闪光。整幅构图中还散布着花卉和爆炸星元素。整体风格让人联想到 {argument name="design era"
一个提示,要求创作一幅特定构图:一张照片中包含 Sam、Ilya 两位人物和一只狗。风格指定为“2000年代胶片相机风格”,情绪为“在儿童生日派对上显得很无聊”。
提示语
将 Sam、Ilya 两位男性和这只狗合并到一张 2000 年代胶片相机风格的照片中,让它们在儿童生日派对上显得很无聊。